Website building, domain names, fulfillment options, marketing, online payments, and APIs – setting up an e-commerce store might seem difficult, but this couldn’t be further from the truth. As the most beginner-friendly e-commerce platform, Shopify makes it easy for new merchants to enter the ecommerce business. Thanks to the platform’s clear and intuitive interface, learning how to sell on Shopify is straightforward.
This piece will give you a step-by-step guide on how to set up your e-commerce website on Shopify so you can start selling online.
Before You Start
Clarify Your Big Idea
What do you want to sell on Shopify? Who is your target audience? What is your business structure based on? Is it dropshipping, ai dropshipping or POD, or are you selling products you’re sourcing yourself? These are essential questions to answer before setting up an online store.
A well-defined idea will streamline almost all business processes as we advance. It allows you to effectively establish marketing and sales channels, and order fulfillment, among other e-commerce processes. Carefully considering your big idea will go a long way in setting you up for success in the e-commerce business.
Design a Business Name, Logo, and Domain Name
Once you have your big layout, give your Shopify store an identity. At this stage, people are always pressured to come up with the most captivating brand name known to man, but simplicity is better.
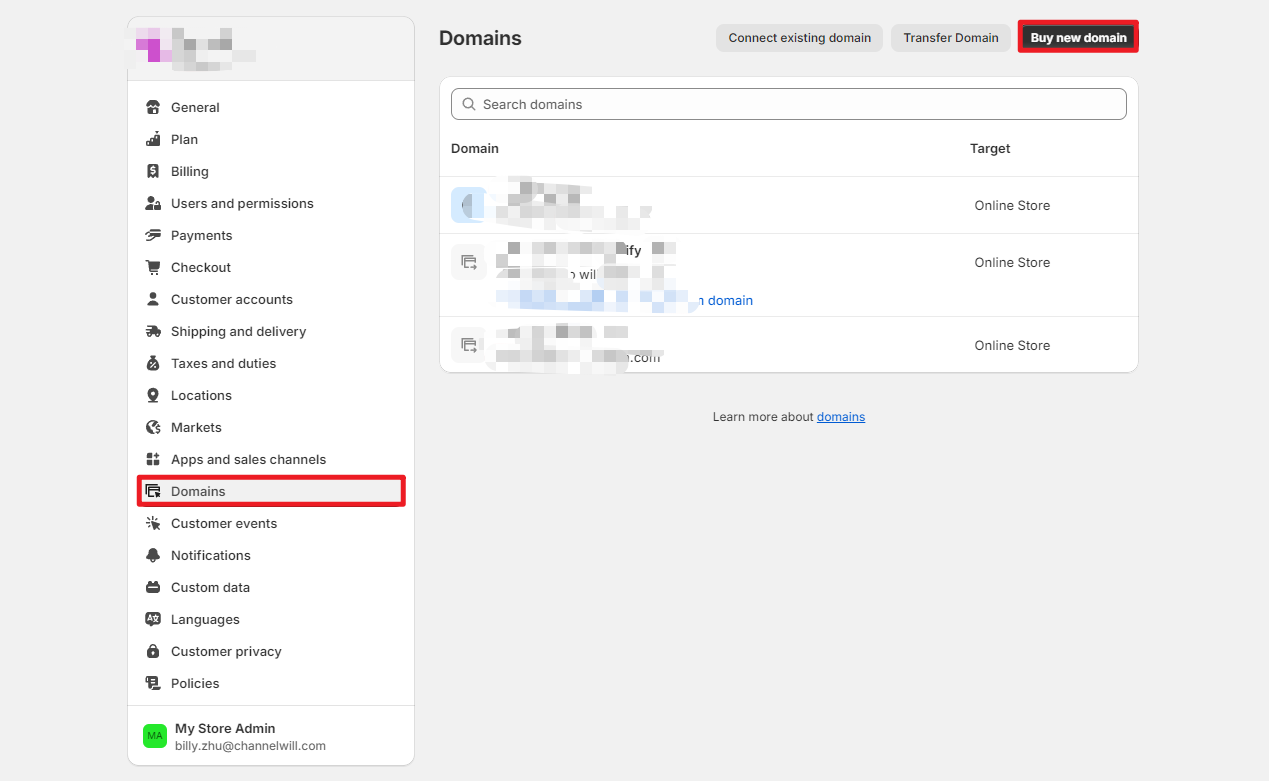
Your business name should be short, memorable, and original while accurately reflecting the products you’re selling on Shopify. Next is the domain name and logo design. You can buy a new custom domain name through Shopify Domains and captivate your logos on Shopify Hatchful.
Organize Your Business Essentials
With your big idea in mind, it is time to structure your new business as a recognized legal entity. The tax man, investors, and creditors will want to know what type of business you’re operating. Additionally, Shopify requires merchants to provide legal details before selling products online.
Here’s what you need to do:
Define your business structure
Is your business a sole proprietorship, partnership, or LLC (Limited Liability Corporation)? Sole proprietorships are the best options for small businesses and entrepreneurs since they’re the easiest to set up and manage. On the other hand, if you intend to have employees in your new business, then LLC is the best route for you. LLCs enjoy the liability protection found in different corporations.
Acquire a bank account for your business
While you can use your bank account for your online store, having a separate business bank account is recommended. The account should also be compatible with Shopify for payment transfer and tax purposes. You can check bank information requirements in the Shopify payment section.
Shopify also offers its payment gateway called Shopify Payments. Merchants can use Shopify Payments to accept payments online without going through the hassle of third-party payment gateways. You can activate Shopify Payments in the ‘Payment’ section after verifying your eligibility.
Register for sales tax
E-commerce stores are required by law to collect sales tax. Therefore, you must learn how to comply with e-commerce sales tax laws before learning how to sell on Shopify. So, firstly, you’ll need to research your state’s laws on e-commerce sales taxes and determine where you need to collect tax. Secondly, you’ll need to obtain a sales tax permit or seller’s permit to collect taxes.
Map Out Your Business Plan
Finally, figure out a business plan before designing your online store. At this stage, you should have a rough idea of your daily operational tasks determined by your business model. For example, if you’re a B2C merchant, you’ll deal with straightforward sales channels and keep up with the latest trends. However, if you’re a B2B merchant, prepare to keep up with complex sales cycles.
To streamline the process of reaching the right audience, consider consulting a B2B digital marketing agency that specializes in targeting businesses and optimizing sales strategies.
How to Sell on Shopify: 10 Steps for 2025
1. Sign Up for Shopify’s Free Trial
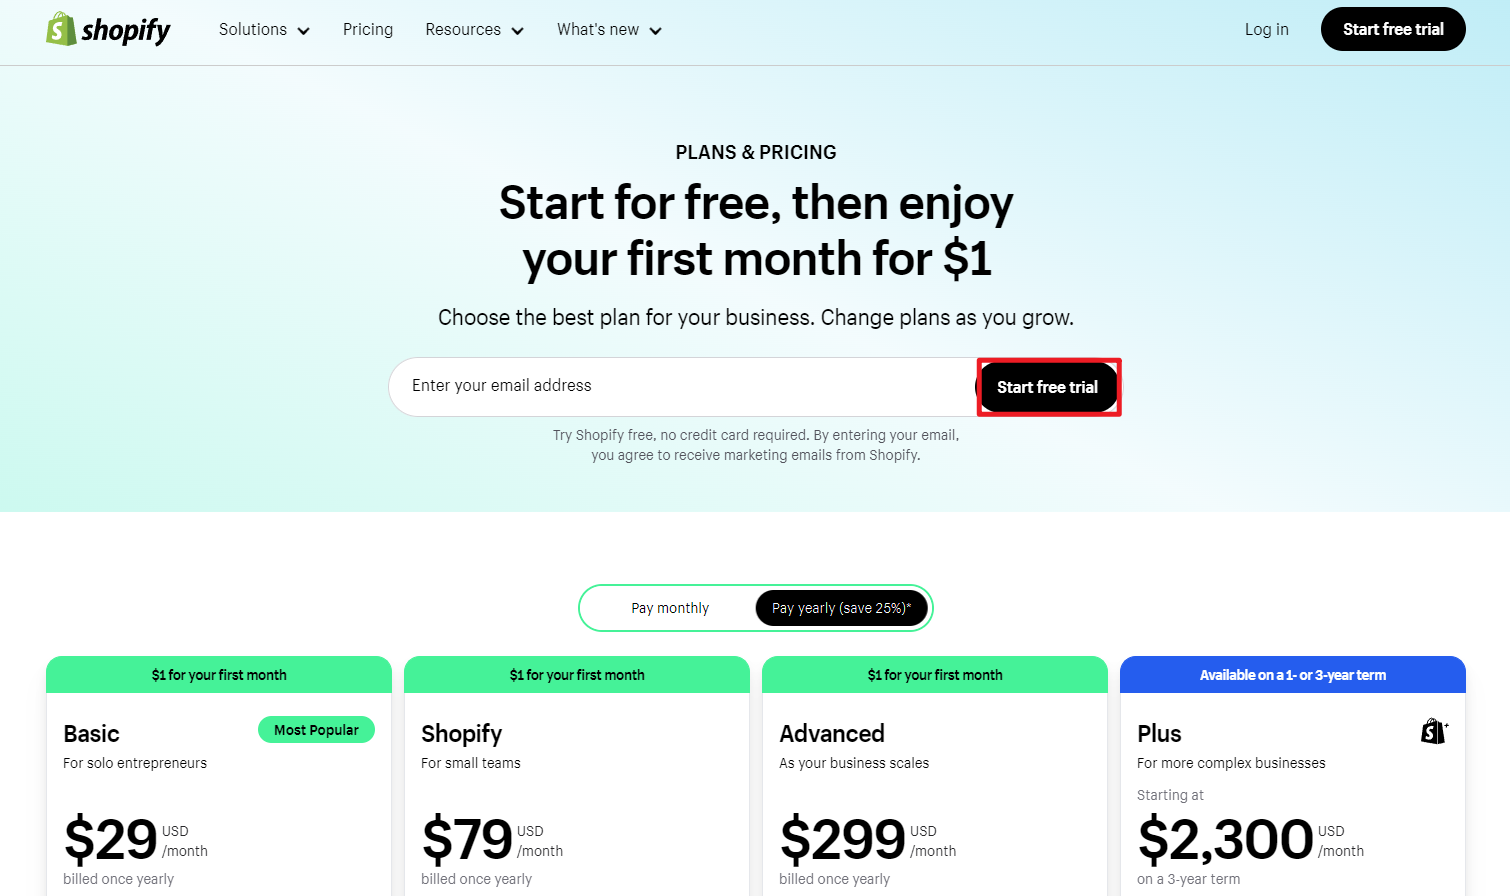
Shopify has one of the best deals among ecommerce platforms for new merchants. You can start your ecommerce store for free with Shopify’s free trial for three days and then $1 for the first month.
Once the three days are up, you can continue getting access to all Shopify features, including the online store, sales channels, and social media integration. So for one month and three days, you can set up an online store, sell products, and test the viability of your venture for a dollar. When the time is up, you’ll be prompted to choose a plan among the Shopify pricing plans.
To start, visit Shopify.com, click ‘Start Free Trial‘, enter your email address, and create a password for your account. When you finalize creating your account, Shopify will ask you a few questions to personalize your experience on the platform. Once everything is in place, you’ll be taken to the Shopify dashboard of your new online store.
2. Add a Custom Domain Name
Adding a custom domain name is important since customers will require a website address to reach your Shopify store. If you’ve already selected a brand name, it’s best practice to use that as your custom domain name. For example, if your brand is named “Pack Shack,” the domain name can be ‘packshack.com’ or ‘packshack. int’.
To add a domain, go to the ‘Settings’ section in your Shopify admin dashboard and click ‘Domains’. You will get two options: buy a new domain and connect an existing domain.
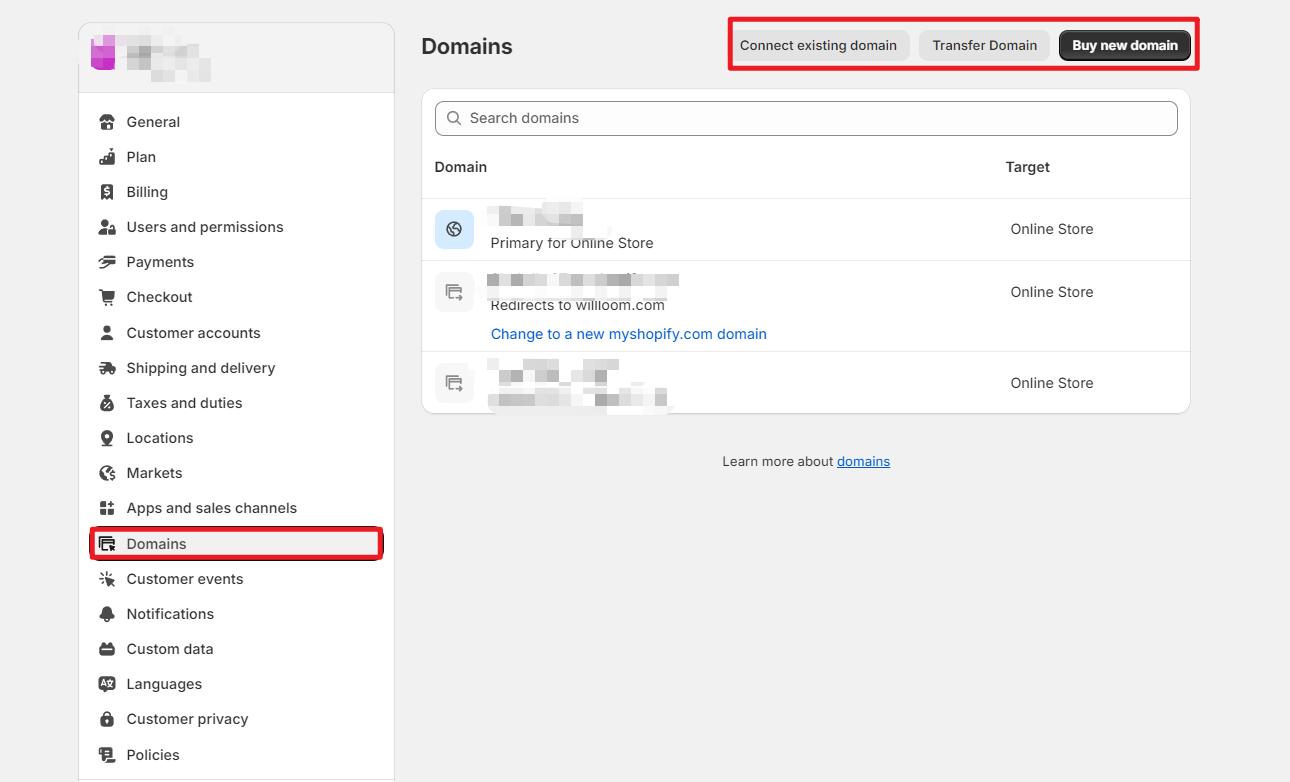
The first option is to buy a new custom domain name straight from Shopify. Here, you need to insert the store name in the field and Shopify will generate a list of custom domains to choose from. The domain list will also show the price of each custom domain name, typically billed per year.
If you choose the second option—connecting an existing domain—Shopify will guide you through the process. While it may involve a few steps, it provides clear instructions on setting up your domain with your domain host provider.
When you create an account, Shopify automatically generates a domain name with the extension “.myshopify.com.” However, it’s not ideal as your online store name because it may affect your brand’s SEO and brand identity.
Tips on creating a custom domain name
- Go for the “.com” extension, as it is the most popular and trusted by people.
- Create a short domain name that reflects your brand identity and includes relevant keywords, making it easy to remember and enhancing SEO.
3. Set Up Your Basic Store Settings
Before designing your online store and selling on Shopify, configure the settings first. New merchants often leave the settings configuration for later, which causes issues down the line.
General store details
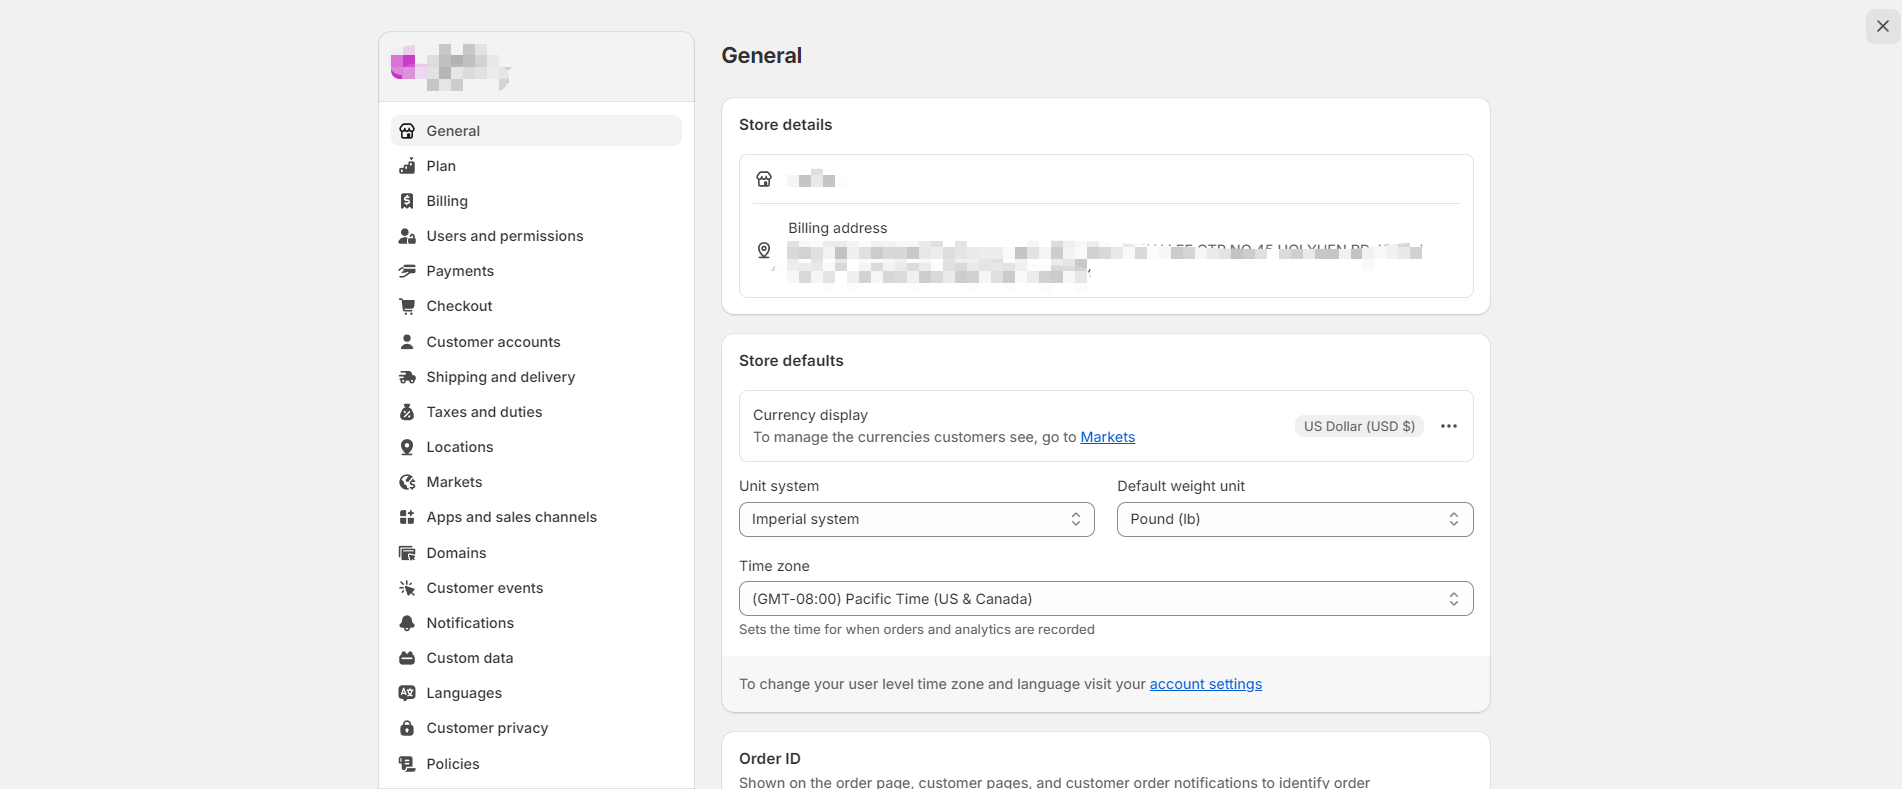
This section can be found on the Shopify dashboard under ‘General’. In this section, you’re allowed to edit the general profile of your Shopify store. The store default section allows you to configure the currency and metrics your potential customers will see. You can further enhance these elements with Langwill to localize your store.
Configure payments
Navigate to the ‘Billing’ section to add your payment details. Here, choose your payment type and add your payment and billing address information. You can also view bills and charges, as well as manage subscriptions, in this section.
Checkout and customer accounts
Toggle to the ‘Checkout’ section to set the information customers need to provide when buying from your Shopify store. It is wise to go with the recommended settings, like not asking for company names from customers.
Shipping settings
Click on ‘Shipping and Delivery’ on the navigation menus to configure shipping options. Here, you can set up custom shipping rates and delivery information like expected delivery dates and pick-up stations.
Register for sales tax collection
Toggle to the ‘Taxes and Duties’ section and choose your region to configure settings for collecting sales taxes. Once you choose a region, you can set the tax rates you intend to charge customers.
Choose your markets
Click on ‘Markets’ to set up the regions you’ll be servicing with online sales. Shopify places your region as the default market but you can change this by clicking on “# countries/regions are not in any of your markets.”
Create store policies
In the ‘Policies’ section, you can create policy pages for your online store. Define return and refund policies, user agreements, privacy policies, and shipping policy pages.
4. Customize Your Shopify Store
Select a Theme for Your Online Store
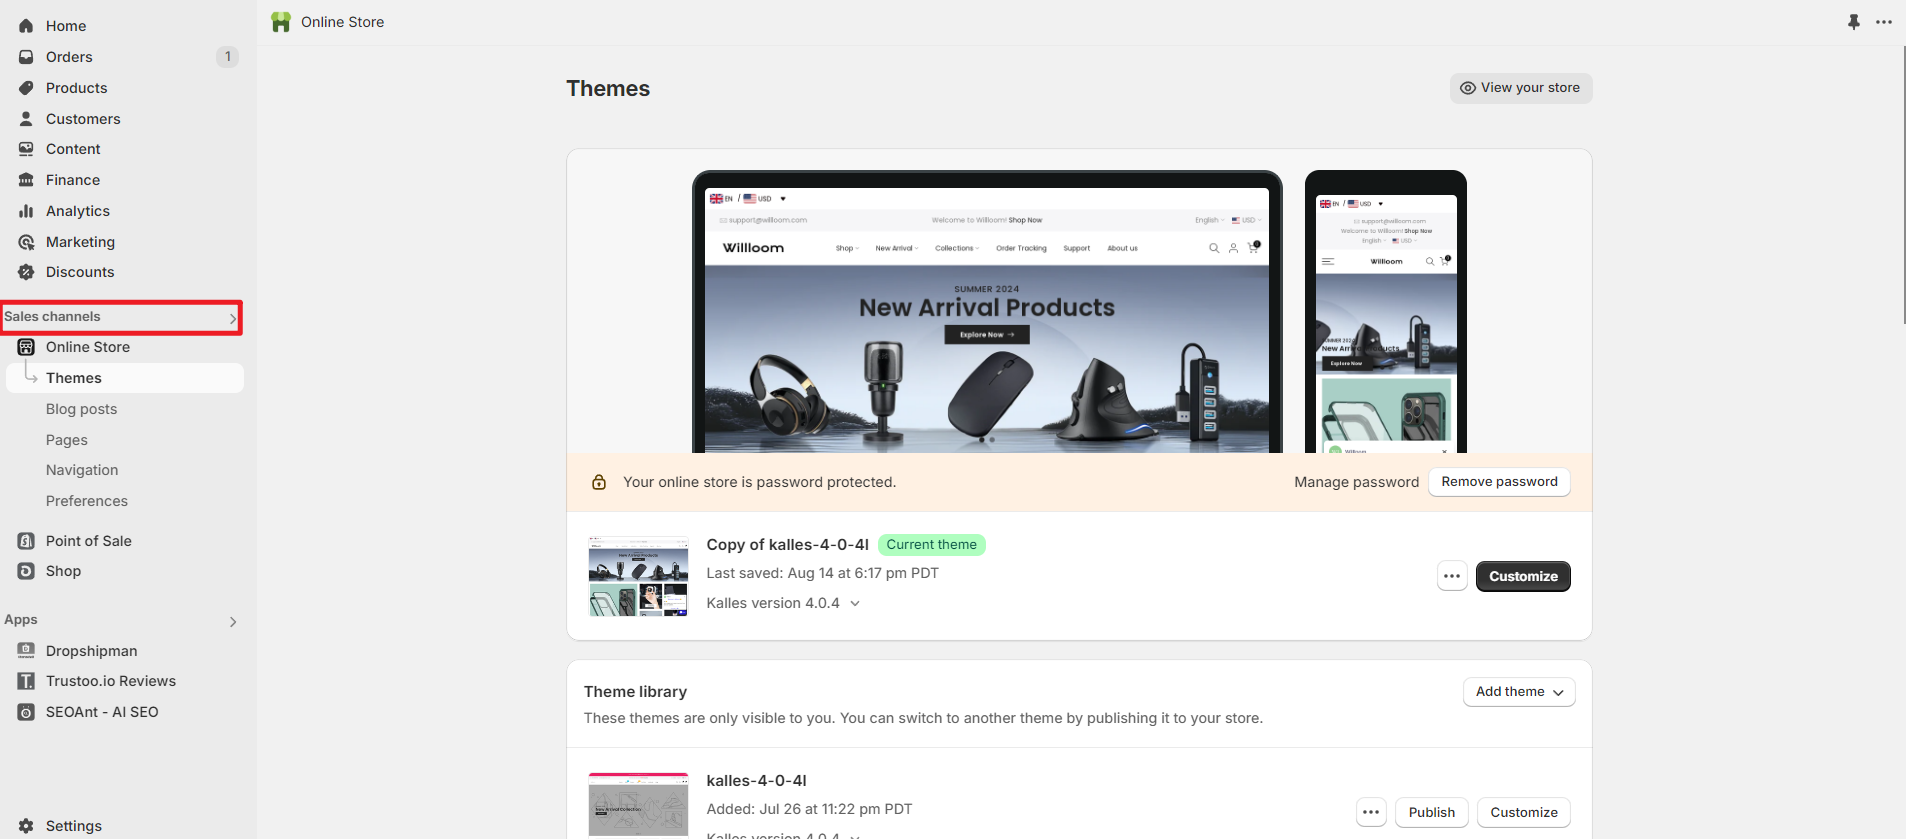
Now let’s start designing your Shopify store. When you start using Shopify, the platform automatically adds “Dawn” as the default theme for your store. To change the theme, go to the ‘Sales channels’, click ‘Online store’ followed by ‘Themes’, then scroll down and click ‘Visit theme store’. Shopify offers over 150 free and paid themes for sale.
Customize Theme Settings
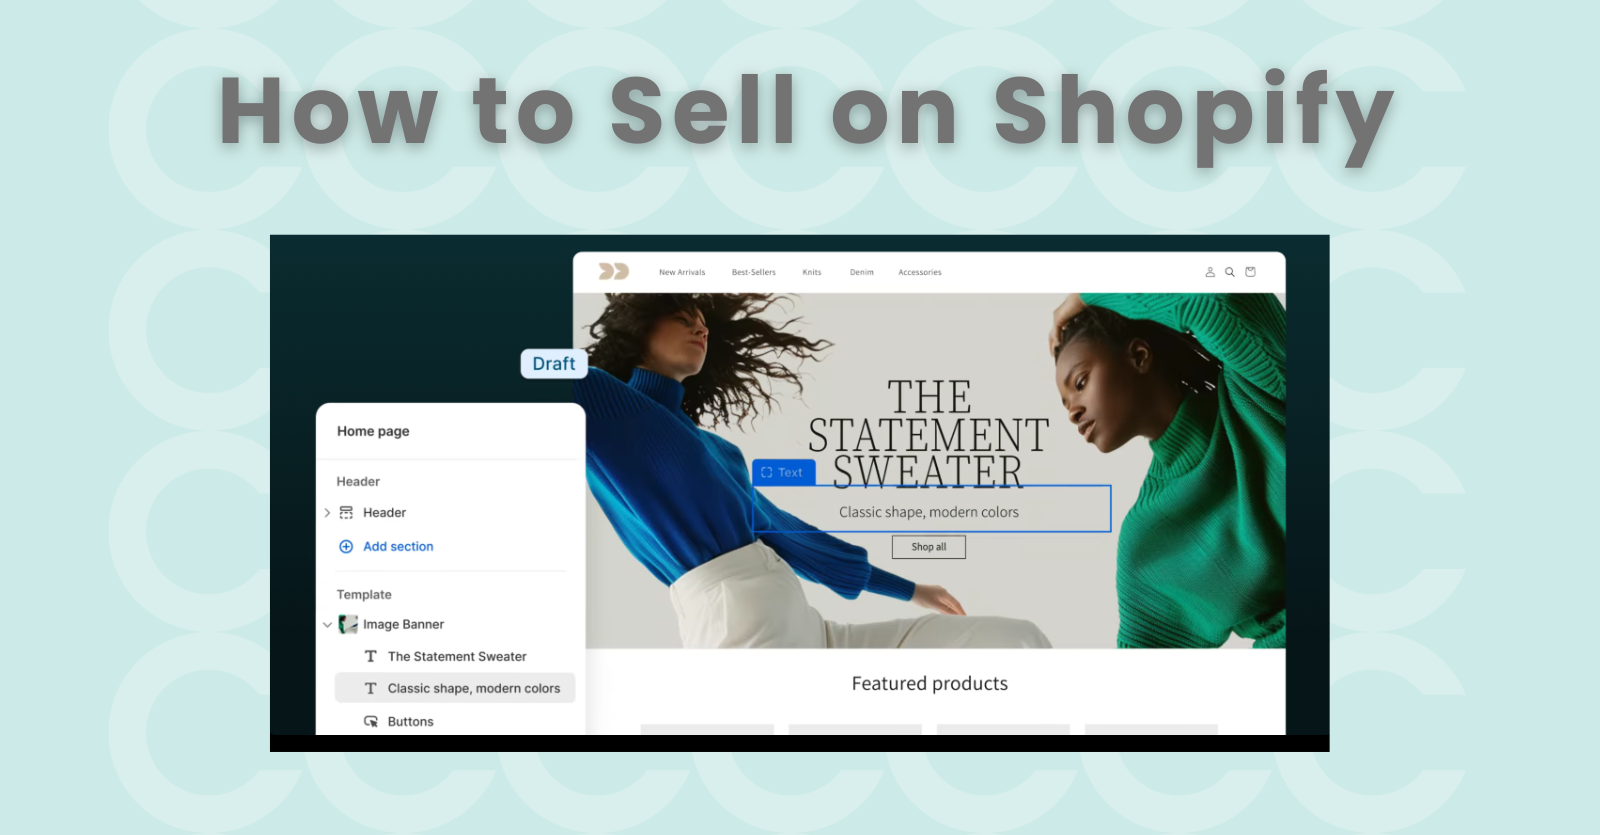
To customize your default theme, click ‘Customize’ next to the theme. You will be redirected to the Shopify store editor, where you can edit different pages and sections of your online store.
Header
In this section, you can customize the announcement bar, logo, and menu to match your brand theme. Some of the things you can do here include adding social media channels and configuring a sticky header so customers can easily navigate your Shopify store.
Store menus
Since the menu of an ecommerce website is its navigational nexus, setting it up right is important. So start by creating and adding pages to the main menu. To do this, click ‘Change menu’ in the header section and then click ‘Create menu’.
Home page
This is your default landing page and, as such, it should link to almost all other channels and pages. Add and edit homepage blocks and sections by going to the ‘Template’ section. Here, you can add featured collections and link sections to product pages.
About us page
An About Us page is a simple page that allows you to promote your brand and products on sale. Tell customers about your brand through a history, mission, and vision statement.
FAQs
FAQs, as a section or a standalone page, answer common questions about the brand and products you sell. You can find these questions in search engines or on social media channels.
Add Necessary Shopify Apps
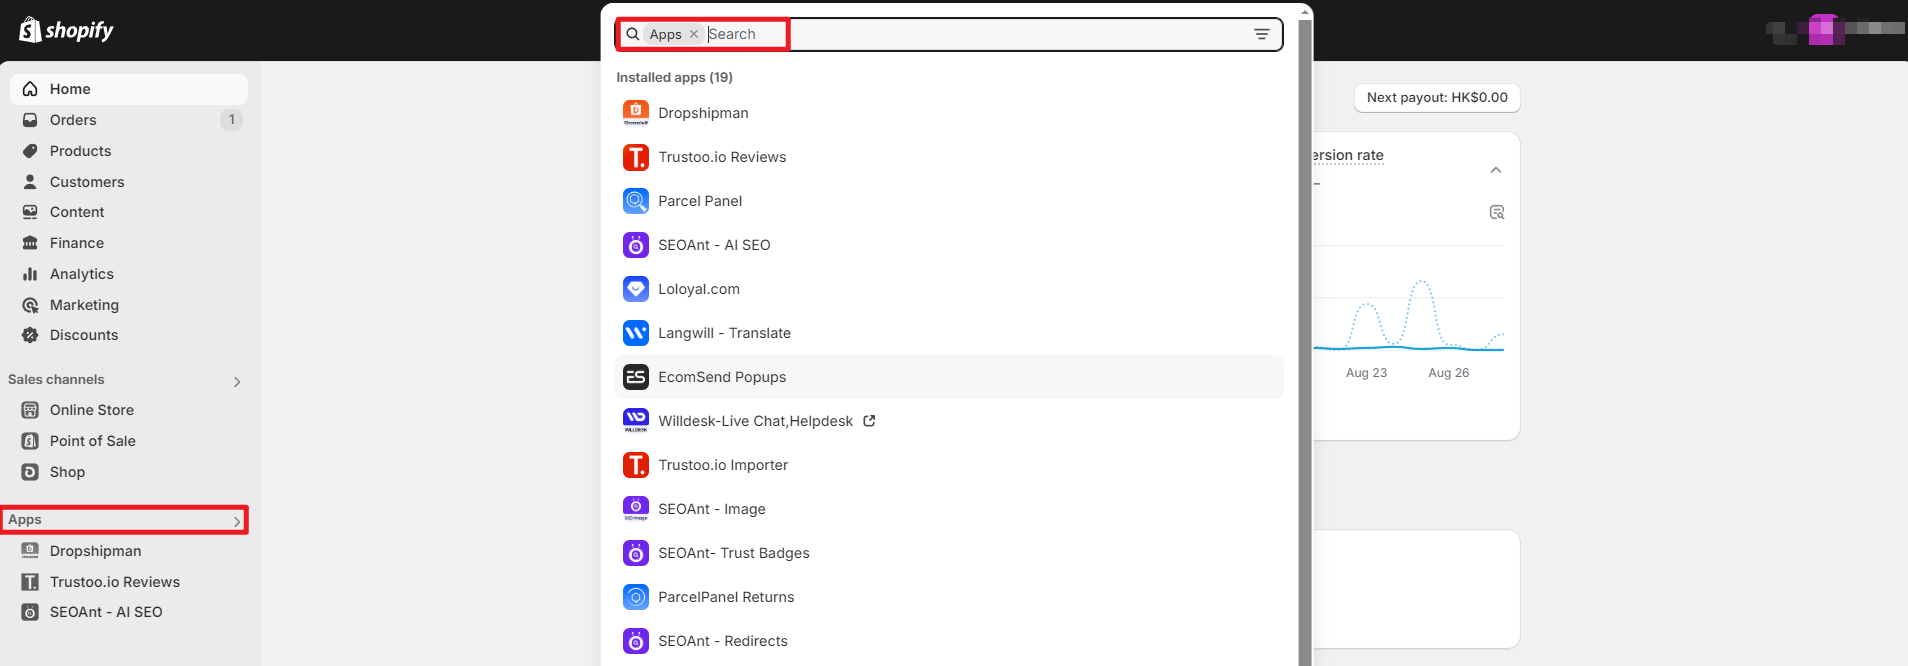
Every ecommerce website requires an integrated tech stack to improve marketing, sales, and user experience. The Shopify app store is packed with apps that facilitate almost every aspect of selling products and services online.
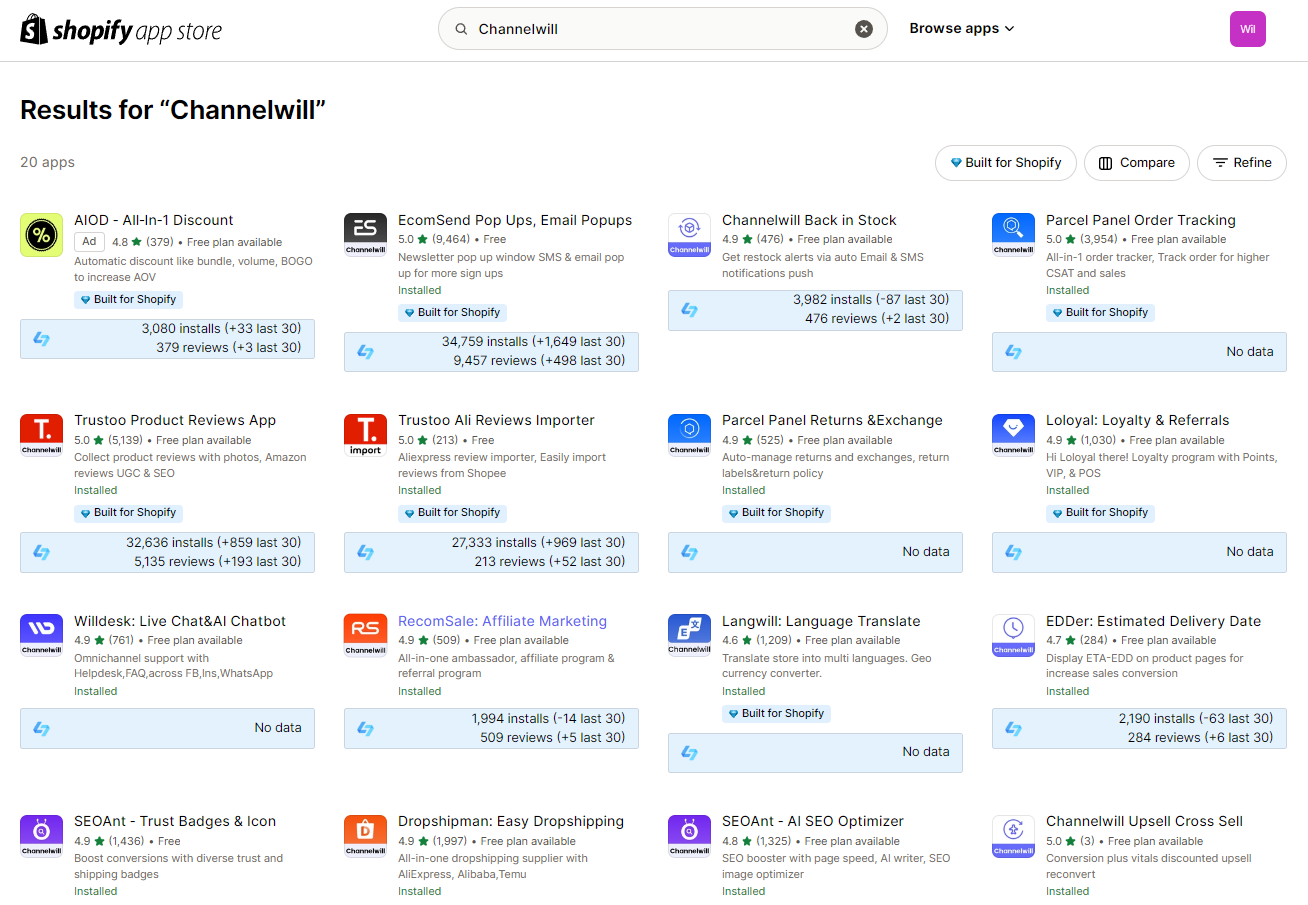
For example, ParcelPanel can help you with post-purchase services such as returns, refunds, and order tracking. Trustoo.io improves sales with customer reviews and rich content displays. To find apps, click ‘Add apps’ from the admin dashboard.
5. Adding Products To Your Shopify Store
Add Products To Shopify
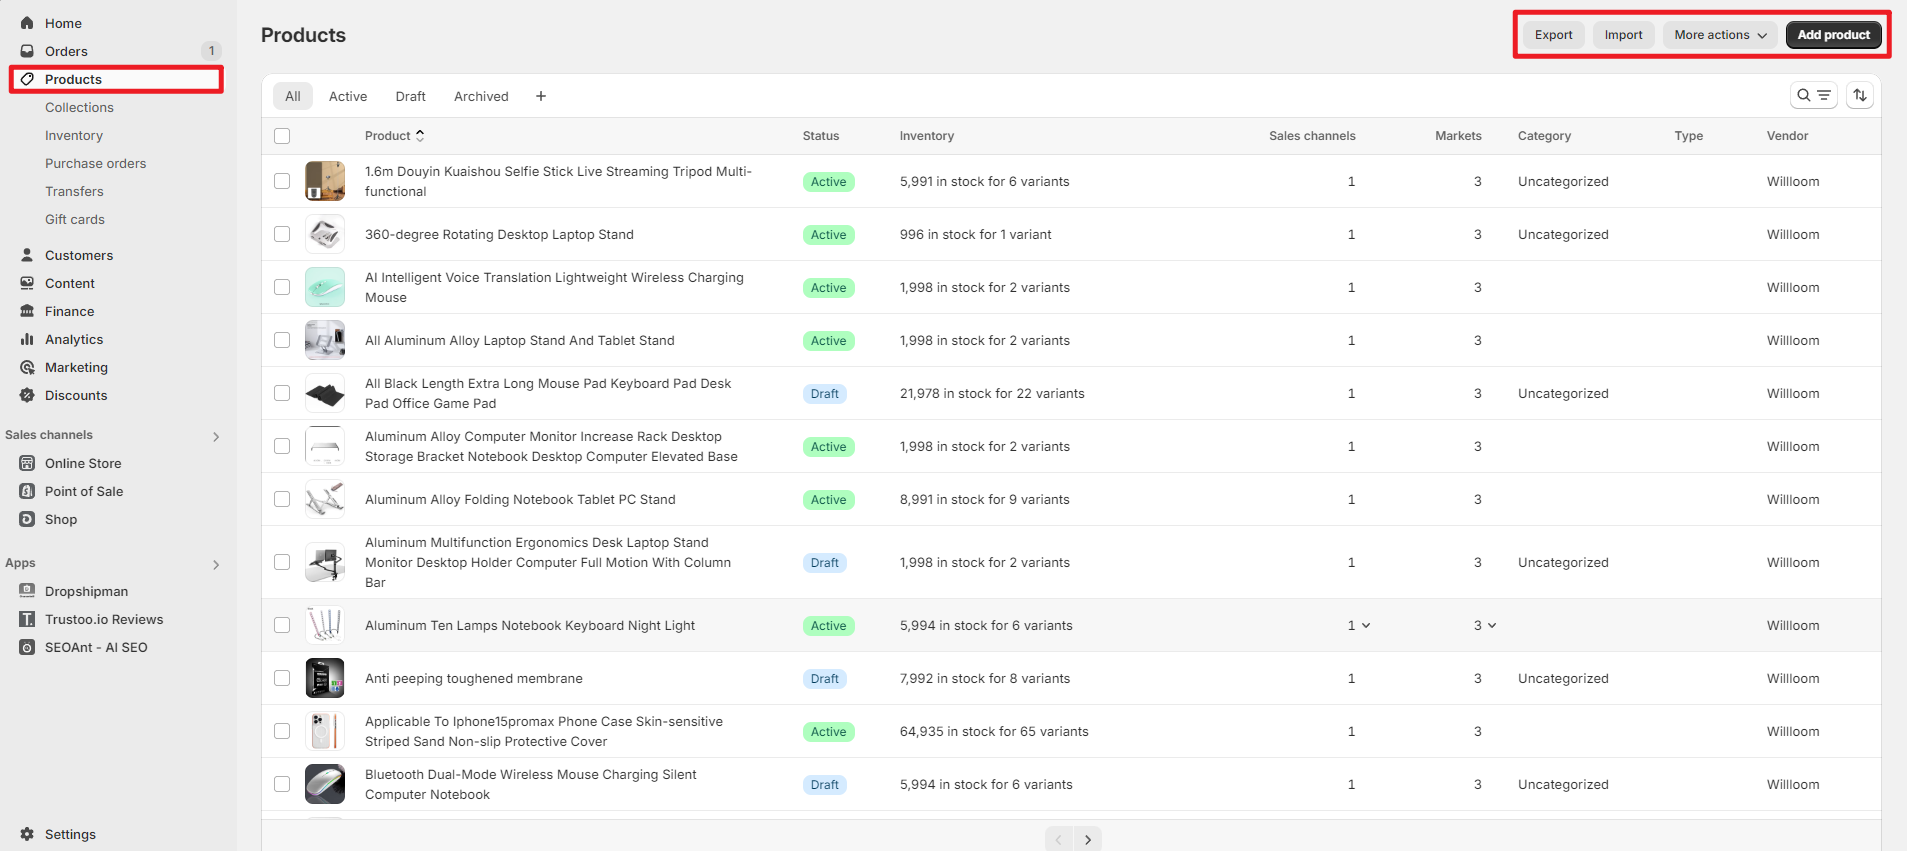
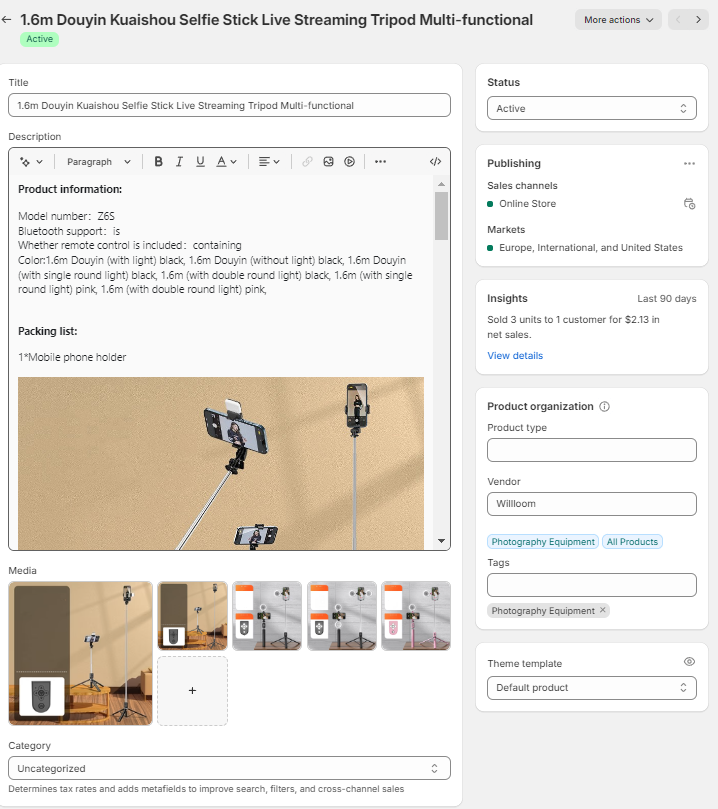
Once you choose what to sell on Shopify, it is time to add the products to your online store. To add a product, click on ‘Products’. You have two options: ‘Add products’ or ‘Import products.’
The first option allows you to add new products to your Shopify account. To start, create a product title and description, add high-quality images, choose a category, and set price points. You can also configure shipping and inventory details.
The second option allows importing products from third-party marketplaces and apps like Dropshipman. Dropshippers can edit products in Dropshipman before importing them directly to their Shopify store.
Create Collections
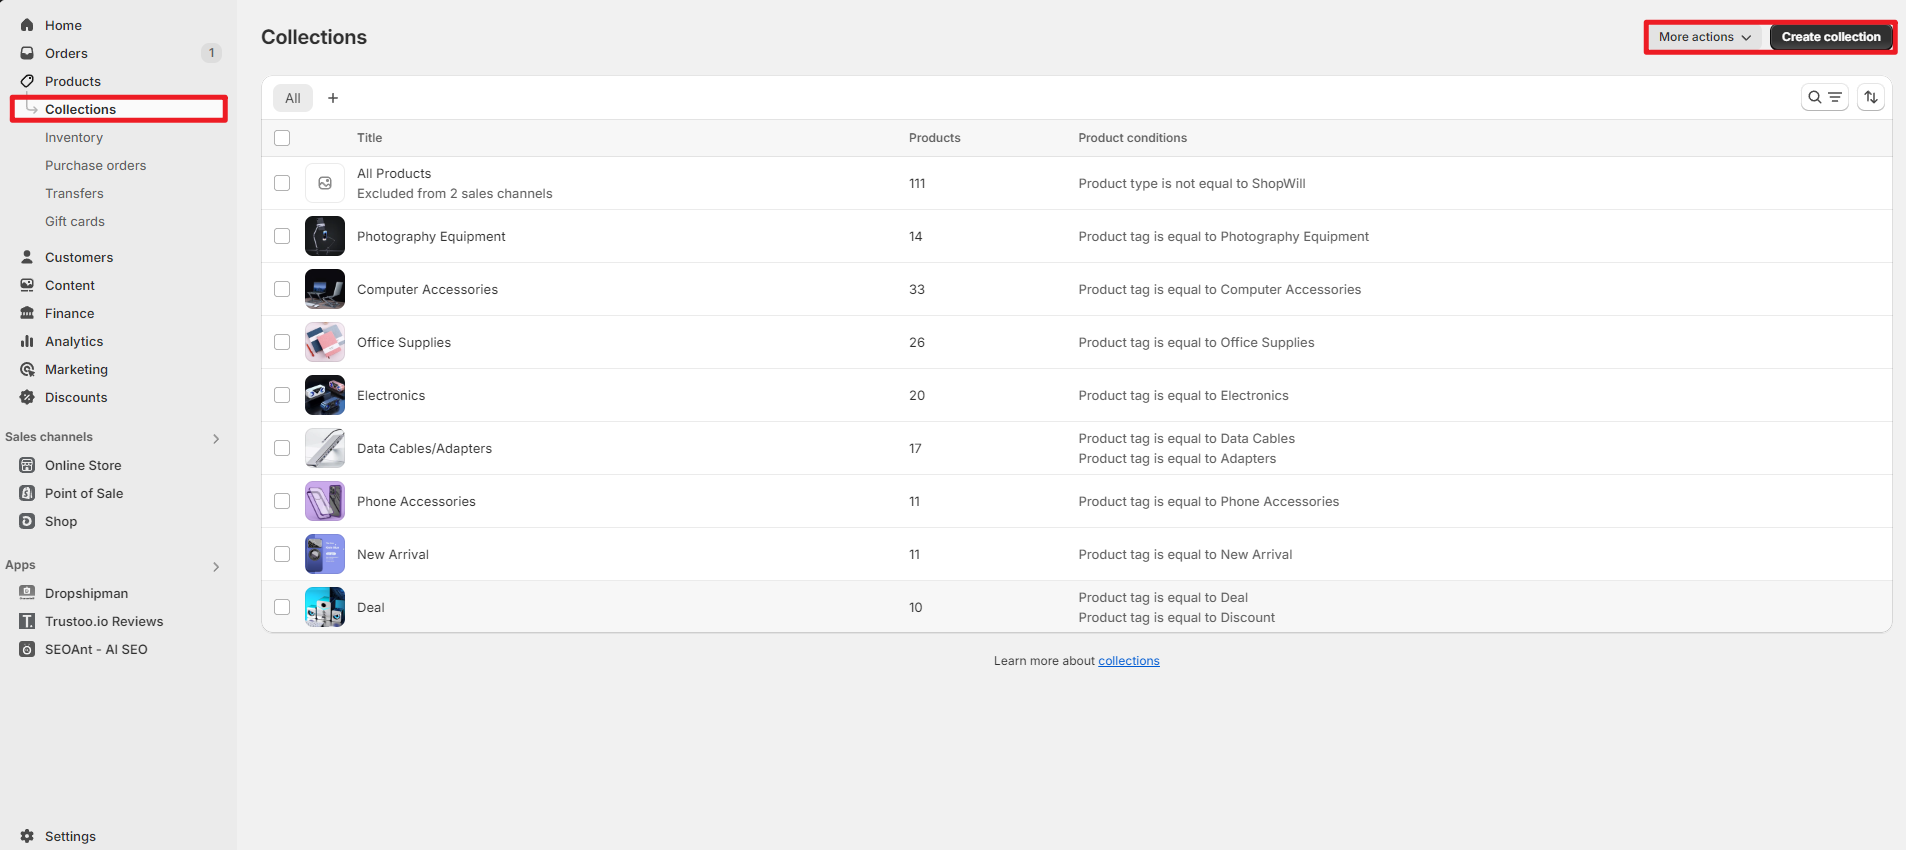
Product collections make it easier for customers to find what they want and discover more products on sale. You can group items based on various criteria like product type, season or holiday, price range, color or size, new arrivals or bestsellers, etc. This makes it easy for customers to search and filter your products.
Still, click ‘Collections’ on the ‘Products’ section to open the collections section, then click ‘Create collection’. Here, you can create new collections for the items you sell. You can also choose to add products to the collection manually or automatically.
Best Practices for Shopify Product Listings
A quality product listing can increase the chances of you making a sale online. Therefore, it’s important to improve the quality of your Shopify product listings.
Here’s how you go about it.
Create captivating product pages
A well-structured product page will go a long way in ensuring you sell items. The page should contain quality images and product descriptions that highlight the values and benefits of the product.
Set competitive prices
You must ensure the pricing is right for your target audience. You can research competitors and market trends to find the right price.
Optimize pages for search engines
Ensure product pages and product descriptions have the right keywords and SEO elements.
Add reviews and testimonials
Product reviews and testimonials are a must-have if you want your orders to sell. You can use review syndication to find new reviews or use existing product reviews if you’re dropshipping.
6. Fulfilling Orders
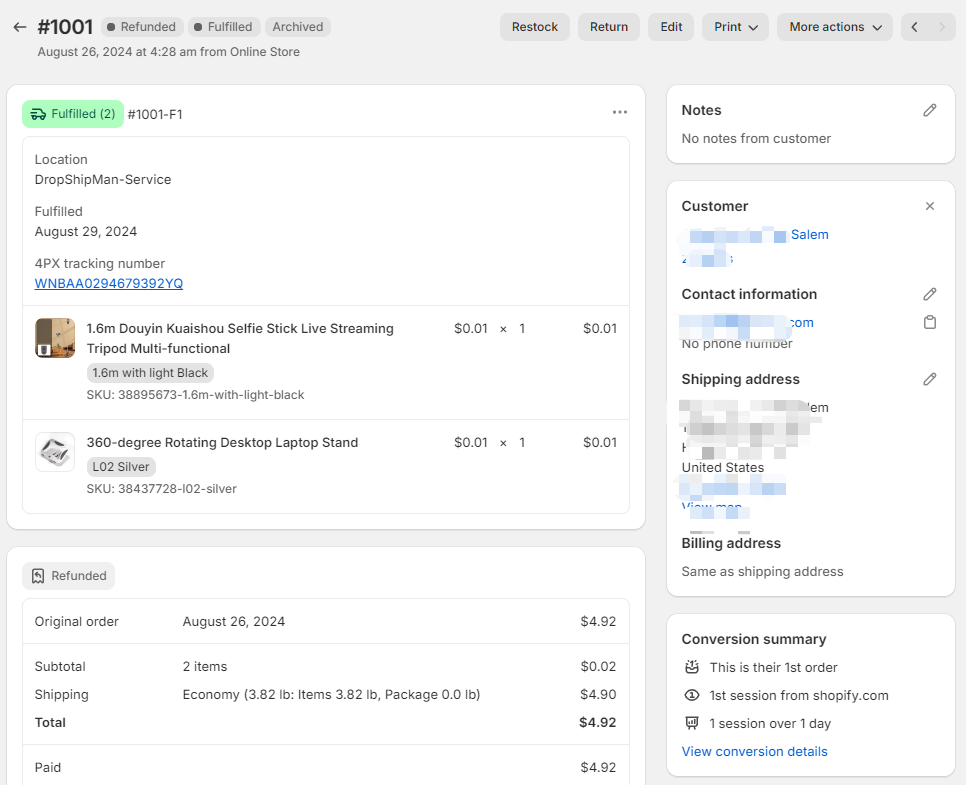
Once a customer places an order, you need to process and then fulfill it. Order processing involves verifying payments, updating inventory, and reviewing the order details to ensure you can fulfill them.
Go to the ‘Orders’ section and click on the order to view its details, including shipping information.
To fulfill an order, you must first purchase and print shipping labels so the product can reach its intended destination. You can find options to print labels in the order details.
There are two ways you can choose to fulfill customer orders:
- You can fulfill orders for products you sell yourself. This involves packaging and delivering your products.
- Third-party fulfillment. Connect your online store to a logistics company that helps handle the fulfillment processes.
7. Place a Test Order and Go Live
Before selling products, test out your newly built online store first. A test order allows you to check if processes like checkout, order, shipping, payment options, and taxes are correctly configured.
Simply Shopify doesn’t charge you for placing a test order. You can use Shopify’s Bogus Gateway to test your online store by simulating a transaction.
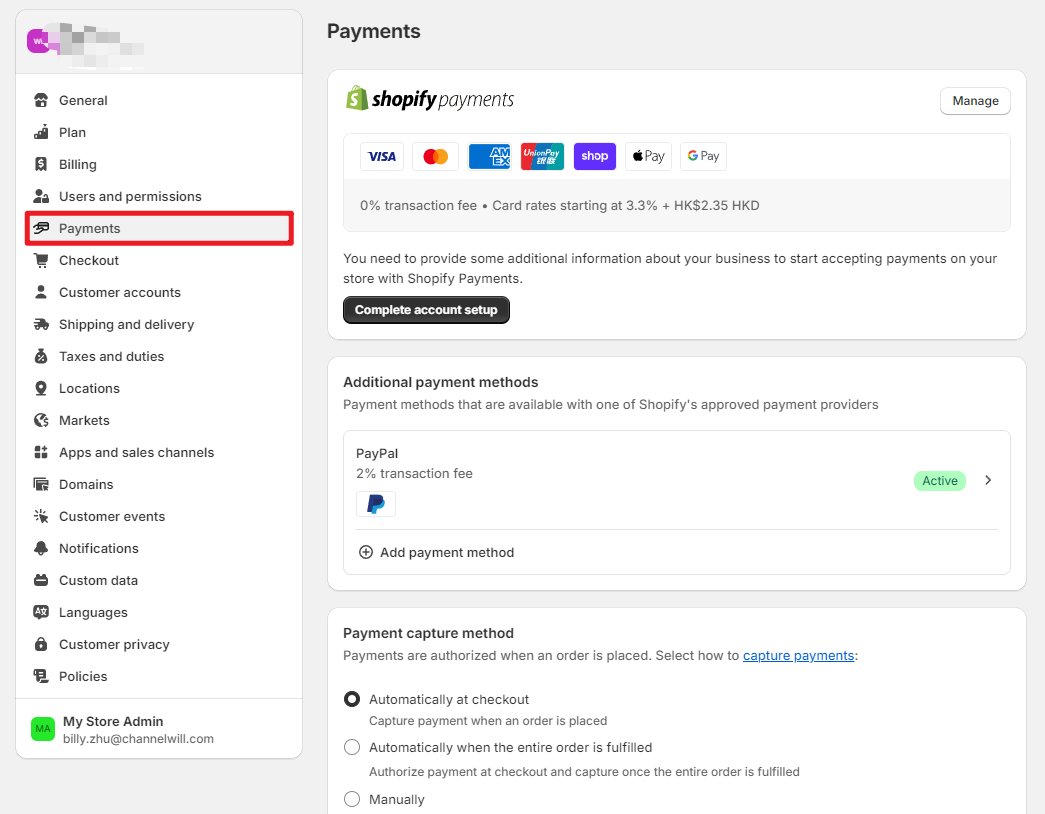
Go to ‘Settings’, then ‘Payments’, and click ‘Choose a provider’. The first option is ‘Bogus Gateway’, select it and then click ‘Activate’ followed by ‘Save’. Now, go back to your store and place an order using the instructions in the Bogus Gateway section. Once you’ve tested your online store, remember to deactivate it so you don’t sell with this option.
If you’re using Shopify payments, then Shopify payments test mode is the way to go. Navigate to the Shopify payments section and click ‘Manage’. You will see ‘Test mode’, select ‘Enable test mode’, and click ‘Save’. If you can’t find Shopify Payments, it might be that it‘s not provided in your region.
When testing, analyze the following:
- Discounts
- Order notifications
- Different shipping addresses
- Shipping rates
- Sale tax rates
- Tracking information
- Place orders from different devices
- Simulate failing a transaction
- Test different payment options
8. Marketing Your Online Store
As a Shopify seller, you can leverage many marketing strategies, channels, and platforms to promote products on sale.
Here are the best ones for new merchants learning how to sell on Shopify.
Search Engine Optimization (SEO)
Organic traffic from search results is among the most sustainable traffic sources. SEO can help your Shopify store rank higher on Google, Yahoo, and Bing. A higher rank means more organic traffic, which can translate to higher conversions for products on sale.
Common SEO practices include:
- Researching and adding keywords and keyphrases to product titles, product descriptions, blog content, etc
- Editing tags for pages and content. For example, meta tags, title tags, and robot tags
- Adding alt texts to images
There are tons of SEO tools and SEO Shopify apps to optimize your online store, for example, Semrush and SEOAnt.
Social Media Marketing
Marketing your Shopify store on social media platforms can expose your brand to a wider audience. Facebook, Instagram, TikTok, and YouTube allow you to promote your store through ads. These platforms see millions of users, providing the perfect opportunity to showcase the products on sale.
You can also set up shops on platforms like Facebook and Instagram. Social media shopping is a growing trend that allows users to shop directly on social channels. Shopify offers integration with popular social networks.
Influencers
Influencer marketing is a social media marketing strategy that uses individuals with a high follower count to endorse products. This marketing approach allows you to leverage the connection influencers have with their followers to promote the sale of your products.
To effectively use this approach, you must find an influencer whose followers are part of your target audience.
Email Marketing
Emails are at the heart of every online business. As such, they provide the perfect opportunity to promote products to customers interested in your business.
This marketing strategy is more affordable and gives you full control of how you promote your brand. You can inform customers about sale offers, promotions, transaction details, and sale events.
The best way to use email marketing is by building an email list. You can encourage visitors to share their email addresses or create contests and giveaways on social networks.
Paid Advertising (Facebook, YouTube and Google ads)
Paid advertising is a powerful marketing strategy that ensures your brand reaches a wider and more targeted audience. Since social channels mostly make money through ads, they provide various ways for brands to advertise their products.
You can create targeted ads with pay-per-impression or pay-per-click models on Google, Facebook, or YouTube.
9. Use Shopify Apps to Grow Your Business
As stated earlier, the Shopify app store offers great apps to grow your online business. You can easily find apps to streamline the sale of your products and services.
Simply go to the Shopify app store and type the eCommerce process you require an app for in the search bar. For example, if you type ‘loyalty programs,’ tons of apps for creating loyalty and reward programs will appear.
Some of the processes you can find apps for include:
- post-purchase services
- inventory management
- dropshipping
- product reviews
- store design
- SEO, and more
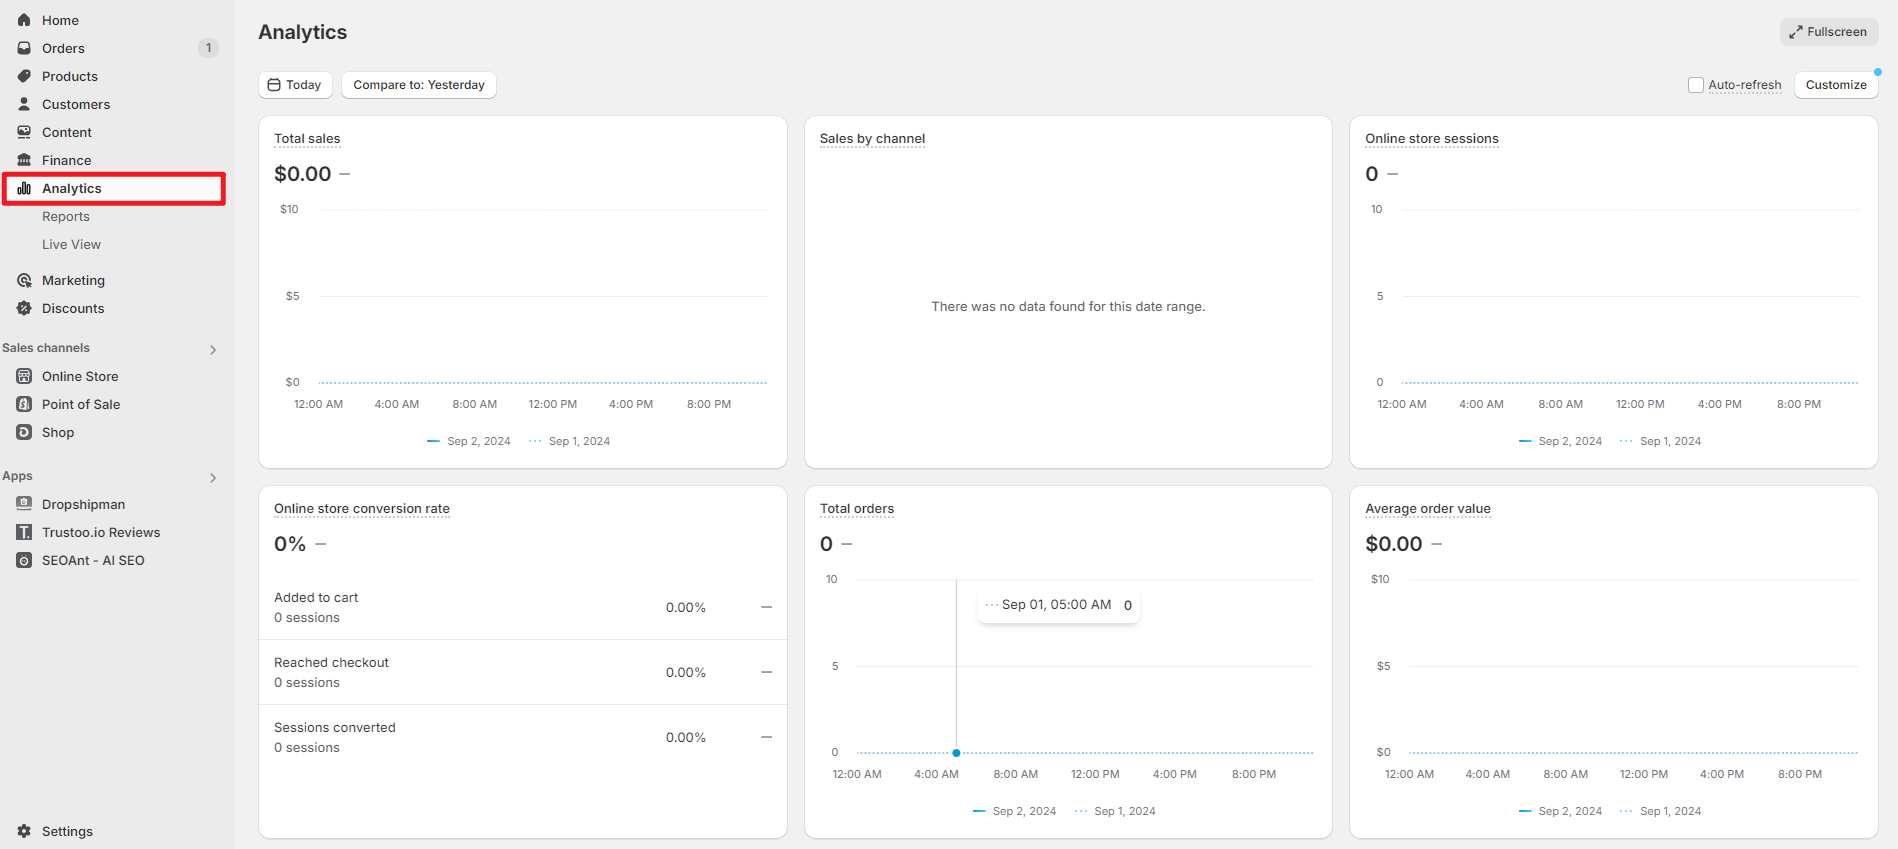
10. Keep an Eye on Your Analytics
Shopify analytics are there to help you gauge the performance of your online store. Analytics and reports allow you to make data-driven decisions that can result in positive changes for your business.
Shopify provides analytics and reports for all stores hosted on the platform. You can use Shopify analytics to view:
- customer behavior
- order reports
- inventory reports
- payment history
- marketing reports
- sales reports
Regularly viewing your store analytics and reports can help you promote your brand and target customers. If you’re looking for more in-depth reports, utilize analytics apps in the Shopify app store.
How to Sell on Shopify Without Inventory
You don’t have to have products in your online store to start selling. Tons of successful online stores sell products and services without inventory.
Common eCommerce models that don’t require inventory include:
- Dropshipping
- Print on demand
- Multi-level marketing
- Selling digital products
- Selling affiliate products
- Offering pre-orders
Final Words
Learning how to use Shopify seems like a daunting task, but in reality, it is a gentle slope. With the right Shopify guide, tools, and a little perseverance, you can get your store up and running soon. Hopefully, this step-by-step guide has helped you learn how to open a Shopify store and make sales.
Start your eCommerce journey on Shopify today!

FAQ
Yes. Through dropshipping, you can create an online store and sell on Shopify. In dropshipping, the supplier will deal with processing and fulfilling orders when you get customers. Pre-orders allow you to accumulate capital and acquire products before fulfilling the orders.
Choose the right e-commerce platform, market your products effectively, set up a complete sales channel, and optimize your store.
Set up a Shopify store and sell to customers. Improve traffic through SEO. Target your customers effectively through social channels. You can also use your Shopify to set up a pop-up shop and cater to seasonal demands.
Find out what customers want and plan out how to meet the demand. Collaborate with companies that make the product.
Note: This blog was originally written in English and translated using an automated tool to make the content accessible to a global audience. We believe in sharing valuable insights with everyone and apologize for any inaccuracies. If you spot any errors, please feel free to contact us for corrections. Your feedback helps us improve and ensures the content’s value is fully realized.


